How to upload Sensor data on Google Sheets through Nodemcu
Prerequisites:
Step 1: Setup Nodemcu for Arduino IDE
Note: For setting up Arduino IDE for Nodemcu visit Step 1 @ https://tinyurl.com/ycd2tdjj
Step 2:Setting Up Google Sheets:
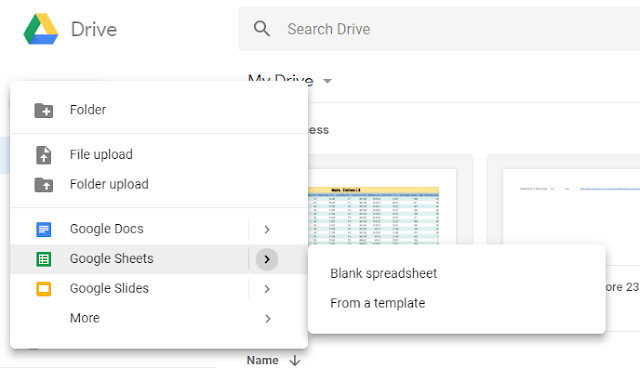
Step 2.1: Open Google Drive and Create new Spreadsheet and name it, after that give the fields with the paramters you want to define.
 Note:
Note:
Sheet id is :

Step 2.2: Now goto Tools-Script Editor:


 Step 2.9: Choose Go to (file name) & then allow:

Step 2.10: Copy the Current web app URL & Click OK:

Note: The URL copied will be something like :
https://script.google.com/macros/s/AKfycbxZGcTwqeDgF3MBMGj6FJeYD7mcUcyo2V6O20D6tRlLlP2M_wQ/exec
The above link is in the form of : https://script.google.com/macros/s/<gscript id>/exec
So here gscript id is AKfycbxZGcTwqeDgF3MBMGj6FJeYD7mcUcyo2V6O20D6tRlLlP2M_wQ
Now we will using the above link to push the data to our Google Sheets:
Example:
https://script.google.com/macros/s/AKfycbxZGcTwqeDgF3MBMGj6FJeYD7mcUcyo2V6O20D6tRlLlP2M_wQ/exec?A=1&B=2&C=3
Paste the above link to the new window and hit enter:


Now the part on GoogleSheets is done, we will move on to the code part that has to be written in order to call the api created.
Step 3: Code:
#include <ESP8266WiFi.h>
#include <WiFiClientSecure.h>
String readString;
const char* ssid = "SSID";
const char* password = "Password";
const char* host = "script.google.com";
const int httpsPort = 443;
WiFiClientSecure client;
const char* fingerprint = "46 B2 C3 44 9C 59 09 8B 01 B6 F8 BD 4C FB 00 74 91 2F EF F6";
String GAS_ID = "Put your GAS ID here"; // Replace by your GAS service id
void setup()
{
WiFi.mode(WIFI_STA);
WiFi.begin(ssid, password);
while (WiFi.status() != WL_CONNECTED) {
delay(500);
Serial.print(".");
}
sendData(113,125); // Send test data
}
void loop()
{
int a,b;
a=1;
b=1;
sendData(a,b);
}
void sendData(int x, int y)
{
Serial.print("connecting to ");
Serial.println(host);
if (!client.connect(host, httpsPort)) {
Serial.println("connection failed");
return;
}
if (client.verify(fingerprint, host)) {
Serial.println("certificate matches");
} else {
Serial.println("certificate doesn't match");
}
String string_x = String(x, DEC);
String string_y = String(y, DEC);
String url = "/macros/s/" + GAS_ID + "/exec?Value1=" + string_x + "&Value2=" + string_y;
Serial.print("requesting URL: ");
Serial.println(url);
client.print(String("GET ") + url + " HTTP/1.1\r\n" +
"Host: " + host + "\r\n" +
"User-Agent: BuildFailureDetectorESP8266\r\n" +
"Connection: close\r\n\r\n");
Serial.println("request sent");
while (client.connected()) {
String line = client.readStringUntil('\n');
if (line == "\r") {
Serial.println("headers received");
break;
}
}
String line = client.readStringUntil('\n');
if (line.startsWith("{\"state\":\"success\"")) {
Serial.println("esp8266/Arduino CI successfull!");
} else {
Serial.println("esp8266/Arduino CI has failed");
}
Serial.println("reply was:");
Serial.println("==========");
Serial.println(line);
Serial.println("==========");
Serial.println("closing connection");
}
Prerequisites:
Step 1: Setup Nodemcu for Arduino IDE
Note: For setting up Arduino IDE for Nodemcu visit Step 1 @ https://tinyurl.com/ycd2tdjj
Step 2:Setting Up Google Sheets:
Step 2.1: Open Google Drive and Create new Spreadsheet and name it, after that give the fields with the paramters you want to define.


Sheet id is :

Step 2.2: Now goto Tools-Script Editor:

Step 2.3: Now Give the name same as that of Spreadsheet:

Step 2.4: Now paste the code from : to the Script Editor Window

Step 2.5: Go to Publish - Deploy as Web App:

Step 2.6: Now change the access type to anyone even anonymous & Deploy:

Step 2.7: Go to Review Permissions:

Step 2.8: Choose Advanced:


Note: The URL copied will be something like :
https://script.google.com/macros/s/AKfycbxZGcTwqeDgF3MBMGj6FJeYD7mcUcyo2V6O20D6tRlLlP2M_wQ/exec
The above link is in the form of : https://script.google.com/macros/s/<gscript id>/exec
So here gscript id is AKfycbxZGcTwqeDgF3MBMGj6FJeYD7mcUcyo2V6O20D6tRlLlP2M_wQ
Now we will using the above link to push the data to our Google Sheets:
Example:
https://script.google.com/macros/s/AKfycbxZGcTwqeDgF3MBMGj6FJeYD7mcUcyo2V6O20D6tRlLlP2M_wQ/exec?A=1&B=2&C=3
Paste the above link to the new window and hit enter:

The you should see message like this, if this appears then your cells are updated with the value you gave:

Step 3: Code:
#include <ESP8266WiFi.h>
#include <WiFiClientSecure.h>
String readString;
const char* ssid = "SSID";
const char* password = "Password";
const char* host = "script.google.com";
const int httpsPort = 443;
WiFiClientSecure client;
const char* fingerprint = "46 B2 C3 44 9C 59 09 8B 01 B6 F8 BD 4C FB 00 74 91 2F EF F6";
String GAS_ID = "Put your GAS ID here"; // Replace by your GAS service id
void setup()
{
WiFi.mode(WIFI_STA);
WiFi.begin(ssid, password);
while (WiFi.status() != WL_CONNECTED) {
delay(500);
Serial.print(".");
}
sendData(113,125); // Send test data
}
void loop()
{
int a,b;
a=1;
b=1;
sendData(a,b);
}
void sendData(int x, int y)
{
Serial.print("connecting to ");
Serial.println(host);
if (!client.connect(host, httpsPort)) {
Serial.println("connection failed");
return;
}
if (client.verify(fingerprint, host)) {
Serial.println("certificate matches");
} else {
Serial.println("certificate doesn't match");
}
String string_x = String(x, DEC);
String string_y = String(y, DEC);
String url = "/macros/s/" + GAS_ID + "/exec?Value1=" + string_x + "&Value2=" + string_y;
Serial.print("requesting URL: ");
Serial.println(url);
client.print(String("GET ") + url + " HTTP/1.1\r\n" +
"Host: " + host + "\r\n" +
"User-Agent: BuildFailureDetectorESP8266\r\n" +
"Connection: close\r\n\r\n");
Serial.println("request sent");
while (client.connected()) {
String line = client.readStringUntil('\n');
if (line == "\r") {
Serial.println("headers received");
break;
}
}
String line = client.readStringUntil('\n');
if (line.startsWith("{\"state\":\"success\"")) {
Serial.println("esp8266/Arduino CI successfull!");
} else {
Serial.println("esp8266/Arduino CI has failed");
}
Serial.println("reply was:");
Serial.println("==========");
Serial.println(line);
Serial.println("==========");
Serial.println("closing connection");
}

Comments
Post a Comment