Posts

Image
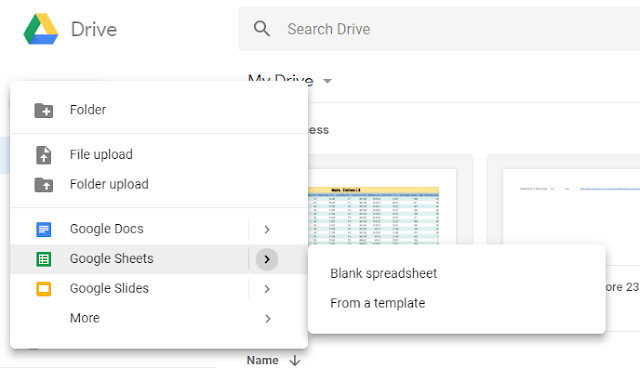
How to upload Sensor data on Google Sheets through Nodemcu Prerequisites: Step 1: Setup Nodemcu for Arduino IDE Note: For setting up Arduino IDE for Nodemcu visit Step 1 @   https://tinyurl.com/ycd2tdjj Step 2:Setting Up Google Sheets:                      Step 2.1: Open Google Drive and Create new Spreadsheet and name it, after that give the fields with the paramters you want to define. Note: Sheet id is : Step 2.2: Now goto Tools-Script Editor: Step 2.3: Now Give the name same as that of Spreadsheet: Step 2.4: Now paste the code from : to the Script Editor Window Step 2.5: Go to Publish - Deploy as Web App: Step 2.6: Now change the access type to anyone even anonymous & Deploy: Step 2.7: Go to Review Permissions: Step 2.8: Choose Advanced: Step 2.9: Choose Go to (file name) & then allow: Step 2.10: Copy the Current web app URL & Click OK: Note: The URL copied will be something like : https://script.

Upload Sensor Data to Blynk

Image
Uploading Data onto Blynk: In this project we will learn how to upload Sensor data on to Blynk Application using Nodemcu Step 1 & 2 : Setting up Arduino IDE for Nodemcu & Installing the Blynk Library: Note: For setting up the above steps visit Step 1 & Step 2 @  https://tinyurl.com/ycd2tdjj Step 3: Setting up the Blynk App: Open the Blynk app and you will get screen like this: Now go for creating a new account, or just login if you have one. After logging in you will get a page like this: Now click on New Project and then give project name, the board which you are using (in our case it is Nodemcu), and the mode which is used to connect to the internet (here it is Wi-Fi), and then create on Create:  Now your project is created and an Authentication key will be generated and sent to your registered mail id, copy the same as it will be used in the code. Now we have to deploy a Display that will display the data received from Nodemcu . So f

Led Control using Blynk

Image
Controlling an LED using BLYNK App on NODEMCU In this project we will learn how to control LED using Blynk App on Nodemcu. Prerequisites: 1. Arduino IDE / 2. Blynk App Step 1: Setting up Arduino IDE for Nodemcu Go to File and the preferences in the Arduino IDE: Preferences tab will open, in the Additional Boards Manage URLs paste the given link: http://arduino.esp8266.com/stable/package_esp8266com_index.json Go to Tools>Boards>Boards Manager, in the search bar, search esp8266 and install the board After installing the board, go to Tools>Boards and Select the board as NodeMCU 1.0: Step 2: Installing the Blynk Library: Go to Sketch>Include Library>Manage Library In the manage libraries search bar, search Blynk, and install the library Step 3: Setting up the Blynk App: Open the Blynk app and you will get screen like this: Now go for creating a new account, or just login if you have one. After logging in you wil